Average Reviews:

(More customer reviews)There are a confusing array of tire chains/traction control devices on the market, and even this particular company makes so many different models that it's hard to tell which ones are the best. Here's what you need to know about chains and traction control devices, and why I like the ones made by SCC. I also include some installation hints at the bottom of this review.
There are two broad types of traction control devices: Tire chains and traction control cables. Tire chains are actual chain links. Traction control cables are long pieces of metal cables, covered in a plastic coating, and designed to form a Z-pattern over your tires. The plastic coating is then surrounded by hundreds of tiny, round, metal springs. Cables are generally regarded as better because they are easier to install, last longer, are less damaging to roads, and work better with vehicles equipped with ABS. Also, according to SCC, you can safely drive with cable devices up to 30 mph, even on roads with no snow, without damaging them.
You should normally install traction control cables on your drive wheels, i.e. the wheels that actually push or pull your car forward. If the snow is really bad, though, you may have to install cables on all four wheels. Read your vehicle's owner's manual for more details on where to install your cables.
In any case, it's a really, really good idea to have TWO sets of cables in your car at all times. That way, if something breaks (murphy's law), you won't be stuck.
Within the traction control cable category, there are two general types of cables: Self-tensioning cables tighten themselves using a tensioner (which looks, feels, and operates like a rubber band) that you install when you put the cables on. Manual tensioning cables are tightened by you, and have to be re-tightened after you drive for a couple hundred feet or so. I've heard that emergency vehicles tend to use the manually adjustable models because they are allegedly safer at speeds above 30 MPH, but driving above 30 MPH for any non-emergency personnel is illegal with any kind of traction control device.
There are several advantages to the manually adjustable models. They tend to have more slack, which can make installation easier. Also, the tensioners (i.e. rubber bands) on self-adjusting cables can and do break (it happened to me today) and if they break, you can't use the cables. So, if you get a cable that has a tensioner, get extra tensioners, or better yet, an extra set of cables, just in case.
Here's a breakdown of SCC's cable products:
Z-Chain- Manually adjustable Traction Control Cable. Easy to install, but must be retightened shortly after you start driving. Very easy to install because they come with lots of slack. Often used by police and fire personnel.
Shur Grip Z/Super Z LT- Self adjusting cable. Tensioners can break so buy extras. Less slack, so can be harder to put on the car, but generally easier than Z-chains because you don't have to manually tighten and re-tighten them.
Super Z6/Z8- Newest Self adjusting cable, designed for vehicles with very little sidewall clearance. They have all the advantages and disadvantages of the Shur Grip Z. In addition, however, the connectors are a little harder to work with on this model because of their low profile.
The Z6 and Z8 models are SCC's latest models. They are designed to handle smaller clearances between the side of the tire and the car than their older models. As a result of that design, they are hand crimped during the manufacturing process (instead of machine crimped), and that results in a slightly higher MSRP. SCC's representative tells me that the cable size and metal springs are the same size as their other cable-based products, and so the only reason to not to get the Z6's over the older models (Super Z's) is that the Z6's are slightly more expensive (usually only a few dollars). I've noticed that the Z6 connectors are a little harder to work with than the Shur Grip/Super Z LT model.
On all of these models, the metal rings are made of a spring-like material, SCC says that you don't have to remove the chains as soon as you reach a paved road. Rather, as long as you drive under 30 MPH, SCC says that you can drive with the traction control cables on your car, even as you switch between plowed and non-plowed roads. Because each of the hundreds of little springs are separate pieces, even when one breaks, it just falls off, and the others work to fill-in the void.
The Z6/Z8 models also come with a very nice cloth bag that is sized properly to hold the cables. The older cable-based SCC models come with plastic containers that are too small to easily lay the cables in.
Installing the cables is relatively easy, and I'm definitely not a hands-on kind of guy. It took me about 15 minutes the very first time, and now that I've done it several times, I can get it done in under a minute per wheel. SCC has a video on their web-site that explains how to do it. You should always do a test-installation of cables before you need them to make sure that you purchased the correct size and know how to install it. It's also very useful to have some waterproof gloves handy and a towel with you, as it is often wet and cold when you need to install chains. A good choice for gloves are the long wristed rubber gloves that you can buy at the grocery store for washing dishes, or some disposal latex gloves. After you use the cables for the first time, fold each cable separately and then use a trash bag tie to keep each one together. Otherwise, the next time you need them, they'll all be tangled together.
Here are some hints on how to install these chains.
1. Read the instructions from the manufacturer and pay close attention to the safety instructions. The basics of the instructions are (1) stay safe, (2) position the cables correctly, (3) connect the upper rear connector, (4) connect the upper front connector, (5) connect the lower front connector, and (6) connect the black rubber bands.
The instructions are quite good, but they leave out a few helpful hints, which I will now share with you.
BEFORE YOU START, MAKE SURE YOU HAVE THE CORRECT SIDE UP! There are markings all over the cables which indicate the correct orientation. Look for them!
2. Put on some rubber dishwashing gloves and lay a towel down wherever you're going to work, or you will get very, very dirty.
3. When you slide the cables under your tires, start from a point between your front and rear tires. Slide half of the chain under your car, and then reach around from the other side of the tire to pull the cable around. Although the instructions describe a swinging slide motion, I've never seen anyone who could do that without twisting the cables up. Just pull them and things will be much easier.
4. Once the cables are around the tire, DO NOT pull the bottom connectors that hold the cables together at the bottom of the tire towards one another. Keep them as far apart as possible. If you pull them in tight, you won't be able to pull the chain high enough in the back to connect the rear upper connector, which is what you are supposed to do first.
5. When you are connecting the rear upper connector, if you can't get the rear upper connectors up above the tire so that you can see them, push the part of the cables that surround the bottom of your tire backwards and under your car a few inches. This will create slack behind the cables and allow you to pull the cables up in the back.
6. Once you have the rear upper connector connected, hooking up the front upper connector may be difficult. Try pushing the rear upper connector back so that it is laying against the inside sidewall of your tire and then pull the front upper connectors towards you as hard as you can. Don't try to pull them towards each other. While sitting, just pull them straight out, towards you, and the rest of the chains should fall into place. Then they should be easy to connect.
7. Gently pull the parts of the chain that criss-cross your tires down towards the ground so that they aren't all bunched up at the top. Look at the chain and make sure that the parts you can see, and especially the blue cable, is evenly distributed around the tire.
8. Then pull the bottom front connectors towards you (out, but not up or down) to create slack. Then connect them. Again, don't try to pull them towards one another as that makes it almost impossible to create slack.
9. On these particular cables, the upper front connector is BLACK and the bottom front connector is SILVER. When you're ready to take the cables off, if you get the wheel lined up so that the BLACK connector is on the top, it will be much easier to find and remove the rear connector (which will be opposite the black connector).
Click Here to see more reviews about:
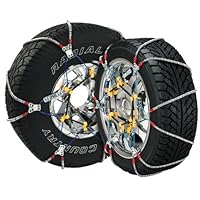
Security Chain Company Super Z6, SZ441, Cable Chain for Pickups & SUVs - Set of 2The SCC Super Z6 SZ441 winter traction product offers superior performance for pickups and SUVs with very limited operating clearance around the drive tires. Be ready for winter driving with an innovative solution that is a step beyond traditional tire chains.
New Design Based on the "Z" family of products, the Super Z6 is designed for vehicles with restricted clearance around the drive tires. The Super Z6 requires only 6.33 millimeters (.25 inches) of sidewall clearance to operate, less than half the space required by most cable and tire chains.A diagonal crossmember pattern provides better outstanding traction and durability than conventional chain systems.
Easy to Install A split outside cable with two fastening positions allows for easy installation without moving the vehicle, so there's no need to stop and retighten. The traction coils are manufactured from alloy steel to increase the lifespan of the product. The Super Z6 is also designed to prevent scratching of alloy or high performance tire rims.
Versatility The Super Z6 is available to fit pickups and SUV tire sizes. It offers a unique combination of performance and convenience features for every user, including a "designed-in" rubber tightener, better all-around traction performance than conventional tire chains or cables, and greater durability.
Designed for High Performance The Super Z6 has better compatibility with anti-lock brakes, traction control, all-wheel drive, and other electronically monitored control systems so as not to interfere with the normal handling characteristics of your vehicle. The unique design also offers a low potential for damage to vehicle body and mechanical components, even when abused.
The Super Z6 SZ441 is designed for tires sizes from approximately 7.50-16LT up to 305 millimeters. Check the manufacturer's website for the exact product to fit your tire size. Also check your owner's manual for clearance specifications before installing winter traction products.
What's in the Box Chains, plastic gloves, one pair of rubber tensioners, durable, re-usable nylon bag, and clear, illustrated step-by-step installation and removal instructions.

Click here for more information about Security Chain Company Super Z6, SZ441, Cable Chain for Pickups & SUVs - Set of 2